Contents
In this article, three Renewable Energy projects for School are covered in detail. Renewable energy is an important concept to understand particularly for the generation that will live through the post “oil age”. Renewable energy provides energy security. We do not have to rely on imported fuel. Renewable energy is also emissions free and therefore it is an important tool through which we can limit the disastrous effects of climate change.
The projects listed herein are generally easy to follow and develop. The activity that will require some input from the teacher, particularly supervision for safety. Furthermore, there are certain items that will have to be purchased. And therefore the approximate costs for the project are also listed.
Project 1: Making a model house that runs on Solar Electricity
Learning Outcome
Students will learn about solar energy and how light can be converted into electricity. They will be able to appreciate the benefits and versatility of electricity as an energy source. Teachers can also emphasize that these systems can help homes in remote and hilly areas where electricity provision by means of a grid is too costly.
Students will be able to appreciate how important electricity is that we normally take for granted.
Difficulty level : Easy
Age group: 8 – 12
Approximate cost: $20-$60
In this article we are going to be looking at building a model house that runs on Renewables (Solar Energy). This activity is simple and students of age group 8-12 would be able to make it, appreciate and learn from it.
Required Items
1. Old Cardboard Box
2. Cereal cardboard box for creating inner detail
3. Paint
4. Solar Power Charger
5. USB lights
6. USB heating element
7. USB fan
8. Packaging tape
9. USB battery bank (optional)
Plan
Take the cardboard box and remove the flaps at the top. Do not throw the flaps as these will be used later.
The cardboard box will be representing a house. Use paint to create details on the inside. Draw rectangles on one side walls of the box to represent windows and the door. These rectangles can be be sliced along three sides. Leave one vertical side for the hinge. The process of slicing through the cardboard can be done by a blade knife or even a kitchen knife. Be careful and let an adult do the job as knifes and blades are extremely sharp.
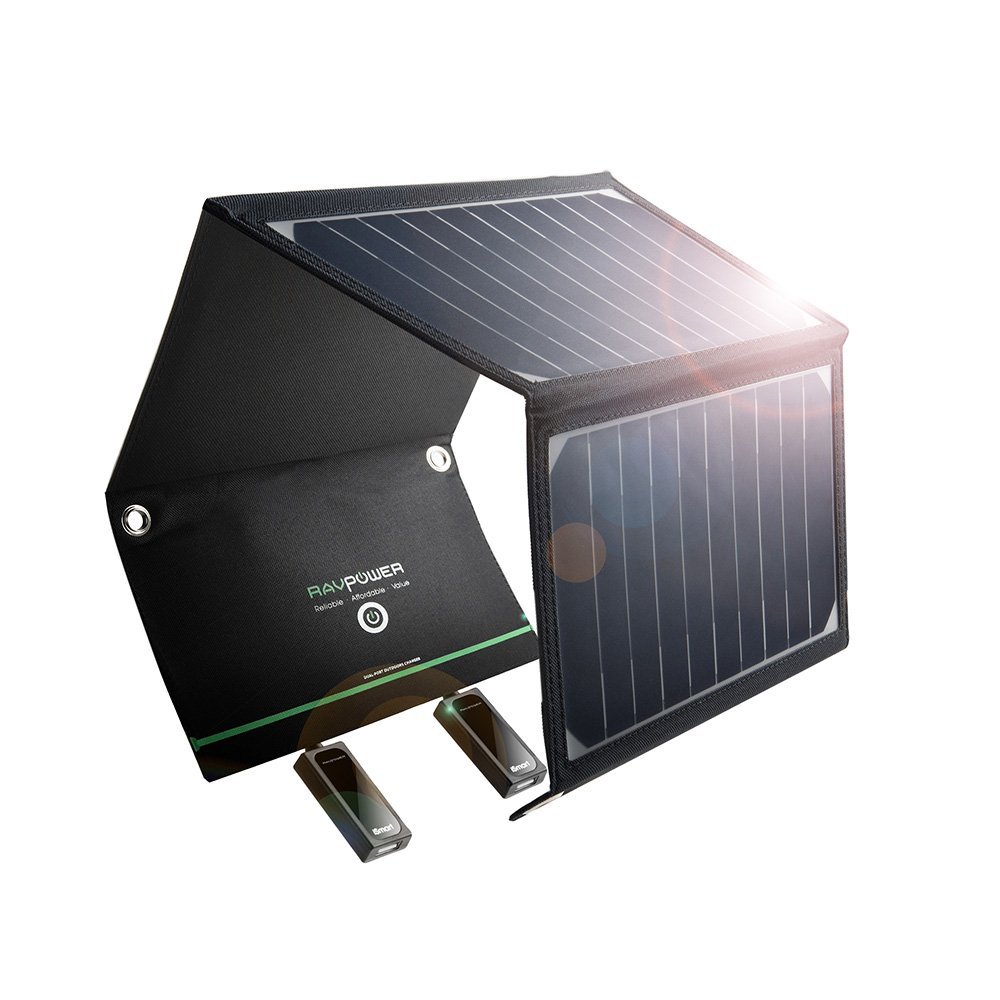
Solar Power Charger with USB ports
Further details can be made by using a thin cardboard such as ones found on a tissue box or breakfast serial box. You can make small cardboard furniture such as table, sofas and chair
Take the flaps that were removed and use packaging tape to join them along their longest side by means of packaging tape. The tape will also act as the crease line where the joined flaps will be folded so that they make a roof like shape. Using more packaging tape and cardboard strips attach it to the house.
You can than use the three USB accessories and place them in different positions in the house. Make sure that their USB port can come out from the back wall.
The Solar Power Charger with USB port can that be placed on the roof such that its USB sockets hang down along the back wall.
Connect the USB ports to the socket and viola, you now have a house that can function on solar energy. This display can be used again and again. The panels themselves will last for 25 years.
Cheaper Solar panel can also be purchased in the form of Car battery charger. These however give a 12V DC output and your accessories should therefore match the voltage. Note that USB port supplies current at 5V.
Project 2 : Making a small Solar Cooker/Oven that can cook an egg
Learning Outcome
Through this project students will learn about using heat from solar energy. It should be noted that in colder regions of our planet, that includes UK, most of our energy is used in heating. Hot water is used for cooking, cleaning and space heating.
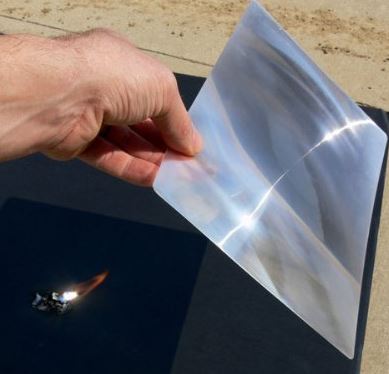
Fresnel Lens that can be used for a variety of solar school projects
In this project students will make a small cooker using simple components and will be able to cook an egg.
Required items
- Empty Jam Jar
- Black Paint
- Magnifying Glass or Fresnel Lens
- Cotton
- Tripod (optional)
Age group: 8 – 14
Approximate cost: $10
Plan
Take the empty jam bottle and paint it such that the half wall (semi-circle) and the bottom becomes black. Make sure that you paint the outer surface of the glass because the inside would be used to prepare food.
Glue some cotton at the back of the wall. The cotton can also be painted black. The cotton layer will act as an insulation.
To cook an egg, just place the yolk and white inside the jar. You can use spray oil or add a few drops of oil or butter before pouring in the egg.
It is ideal if you have sun coming through the window. In that case just place the jar near on a table near the window with the unpainted side facing the sun. Place the Fresnel lens so between the sun and the jar. Make sure that the focused beam of the Fresnel lens goes through the translucent (unpainted) glass surface of the jar strikes the bottom portion of the painted wall.
When the sun is relatively low sun on the horizon, it allows the jar to be placed horizontally on the table. A stand can be made that allows for the Lens to maintain its position. A lab tripod can be used for this purpose. Closing the jam bottle with a lid will ensure a build up of heat. This will speed up the cooking process. It can take up to 15 minutes for the egg to cook completely. Make sure that the Fresnel lens remains in a proper position with respect to the sun. Make sure that the beam is concentrated to the size of a 20 pence coin but not any smaller.
The concentrated beam of light from the Fresnel lens can be dangerous. Avoid concentrated beam to touching wood. Children must be always supervised when using this apparatus.
Project 3: Making a small Hydro Power Project
Learning Outcome
Through this project, students will learn about an important component of renewable energy, namely Hydro power. Hydro electricity is extremely important option as it allows energy storage in large quantities by storing water. To a great extent, the timing when the energy is required and its amount can be controlled by regulating the flow rate of water passing through the dam.
In this project, student will learn to make electricity through hydropower that will be enough to power up small set of LED lights.
Difficulty level : Medium
Age group: 8 – 14
Approximate cost: $40
Required items
- Small 1.5 V motor (normally found in toys)
- Wires
- Crocodile connectors (optional)
- Insulation tape
- Plastic Bucket
- Step ladder or an elevated shelf
- Hot melt glue
- Bottle cap
- Lolly sticks
- Sharp tool (to pierce hole in plastic)
- Plastic tap
Most of these items can purchased from a hobby shop.
Plan
Make a small water wheel using lolly sticks and bottle cap as shown in the diagram. Pierce slots in the side surface of the bottle cap only big enough to push the sticks in. Use hot glue to strengthen the joint. Also pierce a hole in the center and connect it to the motor. Use glue to strengthen joint.
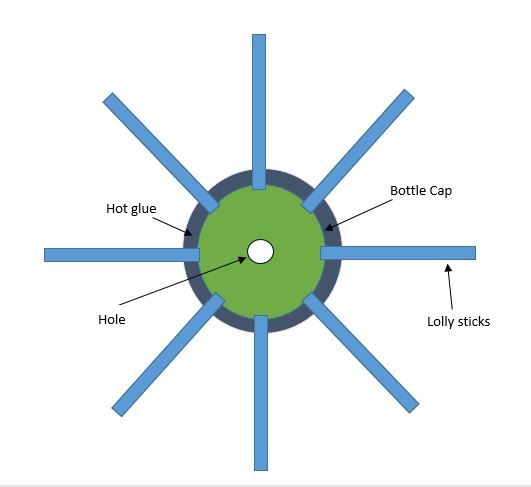
Make a water wheel using bottle cap and lolly sticks
Once the motor has been connected to the waterwheel, it will act as a generator. Just connect the terminals of the motors to the LED lights. The LED’s can be connected either in parallel or in series.
Similarly, pierce a hole on the side wall near the base of the bucket and attach the plastic tap. Use glue again to seal the joint. If you have a water cooler, you can use it instead of the bucket. You can also use other contraptions such as a cork instead of a plastic tap to control the flow.
Fill the bucket with water and place it on the top of the step ladder.
Now open the tap and allow the jet of water to flow. Place the waterwheel in the path of the water jet. As the wheel moves, the LED’s will light up. The faster the wheel rotates, the more brightly they will glow. To maximize the rotation, make sure that the jet hits the outer edges of the lolly sticks as opposed to the base of the wheel.
Permanent stand or fixture can be made the to place the waterwheel and the bucket. Note that the bigger the reservoir (bucket), the more consistent and longer the experiment will be. To avoid a mess, make sure you carry out this experiment in the outdoors.
It is hoped that these projects will inspire students and spark their imagination. These project will educated them about renewable energy which is going to be the major energy source, in the coming times. Practical examples of each of these projects can also be shown to contextualize the learning. Students should be asked to investigate Solar farms, Solar Thermal power stations and a hydropower dams.
Students should also be encouraged to think out of the box and come up with their own projects.
A link on Renewable Energy Games can be accessed from this link
Feel free to share this article, using the buttons below.